
In this series of blog posts, I’ll be diving deep into the GUID Partition Table Schema. I aim to provide a clear understanding of the GPT schema and how it enables forensic investigators to accurately analyze and recover data from modern storage devices. GPT’s support for larger disks, multiple partitions, and improved data integrity features, such as redundancy and CRC protection ensures that investigators can access and verify all necessary data. Moreover, GPT’s compatibility with contemporary operating systems and UEFI firmware enhances the ability to perform comprehensive forensic examinations, making it indispensable for uncovering digital evidence and ensuring the integrity and reliability of forensic findings.
I’ll start with the Protective MBR and how it differs from the traditional MBR used with legacy drives in BIOS. Next, I’ll take you through the GPT header and then the GPT Entry Array. Finally, I’ll share some concluding thoughts and tips on explaining these concepts to a layperson, such as when testifying in front of a judge or jury.
Ultimately, after reading this series, you’ll have no problem tackling a CTF challenge found on our CTF platform.
The Master Boot Record (MBR) from a legacy standpoint provided us with a roadmap to locate up to four primary partitions on a hard disk. Each 16-byte partition entry would guide us to the location of that partition, whether it be FAT32 or NTFS. However, the old MBR had limitations including but not limited to:
LBA 0 (logical sector 0) of a GPT hard disk contains what is called a Protective MBR rather than a legacy MBR. Think of the Protective MBR as a sign at the entrance of the library that tells everyone, “Hey, this library is using a new and improved system now. Don’t use the old method because it won’t work here.”
Instead of containing the location of just four primary partitions on the drive, the Protective MBR marks the entire disk as used by GPT, indicating to older systems that the disk is fully utilized. The Protective MBR exists only for backward compatibility. It contains ONLY one partition entry, which marks the disk and prevents legacy tools from misinterpreting the disk structure.
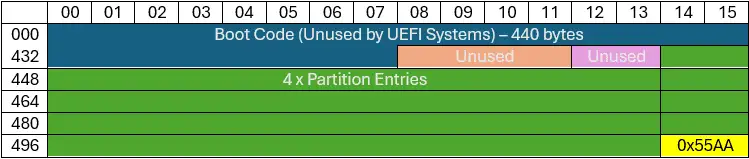
The first 440 bytes of the protective MBR contain boot code that is not used by UEFI systems. It is ignored.
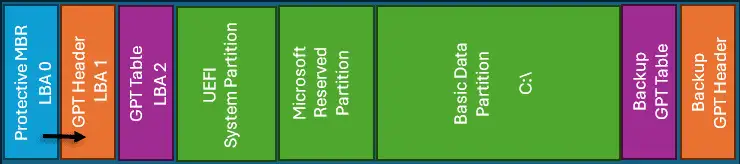
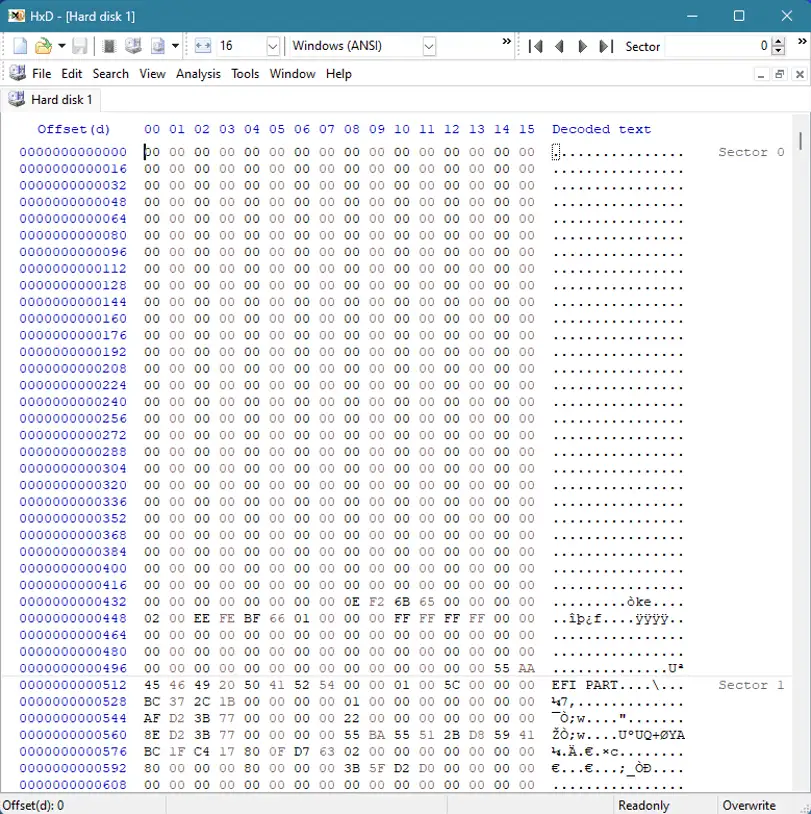
Below is a hypothetical layout of a disk with a fresh Windows 10 install having just one partition created during the installation process, the C: drive. The UEFI System partition is automatically created and hidden from the user, and the Microsoft Reserved Partition is also created during the installation and hidden from the user.
Here we can see the Protective MBR residing at LBA 0, which is pointing to the GPT Header at LBA 1.
Here is an example hex layout of the Protective MBR:
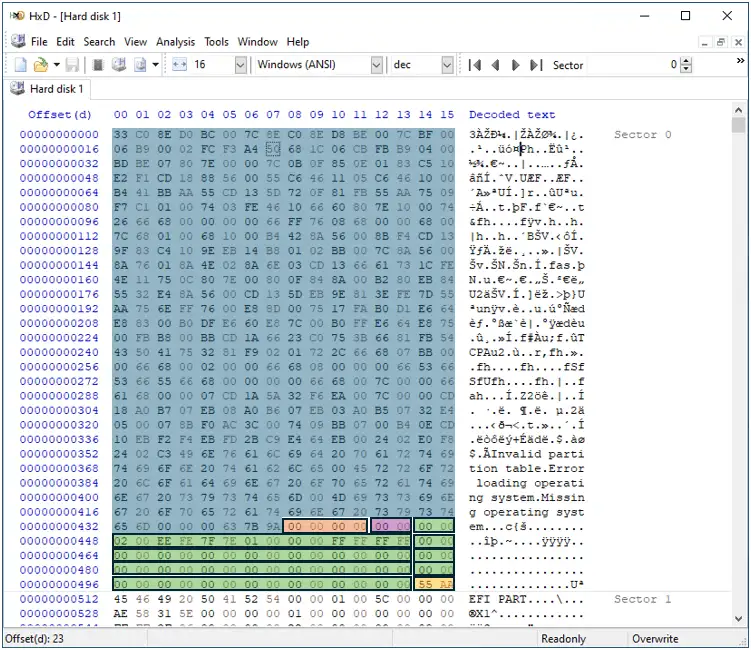
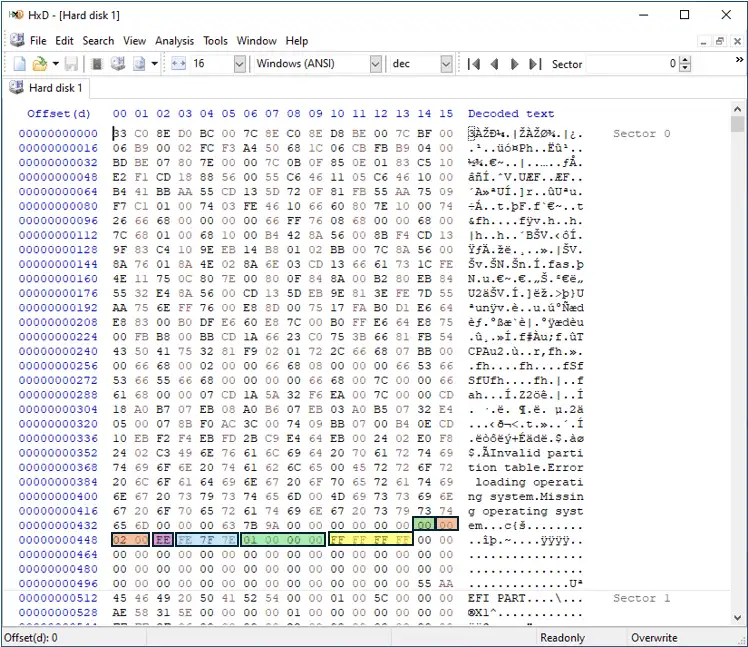
As mentioned earlier, the first 440 bytes of boot code are not used by UEFI systems. You could see these first 440 bytes zeroed out on some systems. Here is the Protective MBR from the workstation I am using to write this blog, where I’m using a Samsung 1TB NVME drive:
As you can see, the entirety of the Protective MBR in this case contains zeroes except for the four bytes located at offset 440 (which are not used), the first “primary partition entry” (which just points to LBA 1 – the GPT Header), and the boot signature located at the last two bytes of the sector (0x55AA).
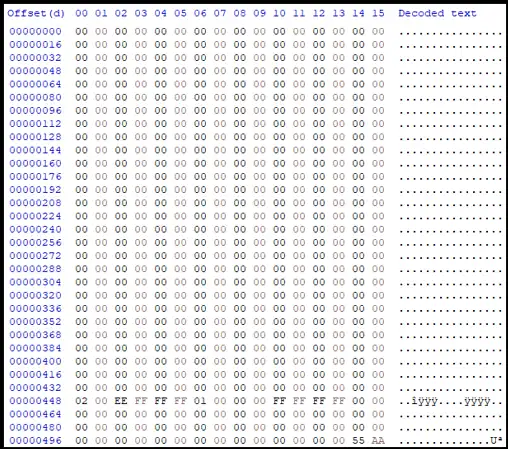
Now let’s take a closer look at the one partition entry that exists in a Protective MBR:

The first byte of the partition entry is set to 0x00 to indicate that it is not a bootable partition. In a traditional MBR, this value would either be 0x00 (non-bootable) or 0x80 (bootable). The next three bytes represent the Starting CHS location (Cylinder/Head/Sector), which will correspond to the 4-byte value in the Starting LBA field at byte offset 8. The Starting CHS value will be set to 0x000200 which when broken down and converted to an LBA address, is 1.
The following one-byte value is set to 0xEE for the OS type: GPT Protective. The three-byte value at offset 5 is set to the CHS address of the last logical block on the disk. The starting LBA, taking us to the GPT Partition Header, is located at offset 8 for four bytes and the value will be set to 0x01000000 (or LBA 1 when read little endian). The last 4 bytes of the record at offset 12 represent the size of the disk minus one. It is set to 0xFFFFFFFF if the size of the disk is too large to be represented in this field, which is most likely the case.
If the MBR was corrupted, lost, or wiped, you could replace sector 0 by copying the Protective MBR from another drive. You could also create one from scratch, leaving 0x00 from offset 0 through 446, and then creating a generic partition entry pointing to LBA 1, ensuring that 0xEE exists at offset 4 to indicate the GPT Protective OS type. Finally, place the boot signature (0x55AA) at the last two bytes of the sector.
| 446 | 447 | 448 | 449 | 450 | 451 | 452 | 453 | 454 | 455 | 456 | 457 | 458 | 459 | 460 | 461 |
| 00 | 00 | 02 | 00 | EE | FF | FF | FF | 01 | 00 | 00 | 00 | FF | FF | FF | FF |
| 510 | 511 |
| 55 | AA |
The following would suffice for a rebuilt Protective MBR:
In this first installment, we explored the Protective MBR and its crucial role in ensuring backward compatibility with legacy systems. We examined how the Protective MBR marks the entire disk as used by GPT, preventing older systems from misinterpreting the disk’s structure. By understanding the structure and function of the Protective MBR, you now have a solid foundation for diving deeper into the GPT schema.
As we move forward, our next focus will be on the GPT Header, the cornerstone of the GPT schema that defines the disk layout and ensures data integrity. In Part 2, we will break down the GPT Header, examining each field and its significance. Stay tuned as we continue to unravel the complexities of the GPT schema, empowering you with the knowledge to effectively manage and recover data from modern storage devices.
Want to dive deeper into the GPT structure?
In Part 2, we break down the GPT Header and explain how it ensures data integrity across the disk.
Then in Part 3, we explore the GPT Partition Entry Array and what forensic analysts need to know when reconstructing partition tables.


5 Responses
thanks for this awesome article.
Great pages (that one and part 2).
Many thanks!
Awesome content, I highly appreciate this piece as well as the 2nd and 3rd part!