

Dans la première partie de cette série de blogs, nous avons exploré le MBR protecteur et son rôle dans la préservation de la compatibilité des disques partitionnés GPT modernes avec les anciens systèmes. Nous avons expliqué comment le MBR de protection sert de barrière pour empêcher les anciens systèmes de mal interpréter les disques GPT, garantissant ainsi que l'ensemble du disque est marqué comme étant utilisé par GPT. Cette compréhension fondamentale prépare le terrain pour une plongée plus profonde au cœur de la table de partition GUID (GPT) elle-même - l'en-tête GPT.
Dans cette deuxième partie, nous allons décortiquer l'en-tête GPT, un composant crucial du schéma GPT qui fournit des informations essentielles sur la structure du disque. Nous examinerons chaque champ de l'en-tête GPT, en expliquant sa signification et la manière dont il contribue à la fonctionnalité et à l'intégrité globales du disque. À la fin de cet article, vous aurez une compréhension complète de l'en-tête GPT, ce qui vous permettra d'analyser et de manipuler en toute confiance les disques partitionnés GPT dans le cadre d'enquêtes judiciaires ou de scénarios de récupération de données.
L'en-tête GPT (GUID Partition Table) est un élément essentiel du système de partitionnement du disque. Il divise le disque en sections distinctes, chacune pouvant stocker différents types de données, tels que votre système d'exploitation, vos fichiers personnels, vos données d'application ou vos jeux. Ces sections peuvent être des lecteurs différents (comme le lecteur C :, le lecteur D :, le lecteur E :, etc.)
L'en-tête GPT comprend une copie de sauvegarde à la fin du disque, un peu comme si l'on disposait d'une clé de rechange pour le catalogue de la bibliothèque au cas où la clé principale serait perdue ou endommagée. Cela nous permet de retrouver nos données et d'y accéder même en cas de problème.
L'en-tête GPT fournit l'emplacement de sa sauvegarde et l'emplacement du tableau d'entrées de la table de partition GUID, qui est une liste d'entrées de partition GPT indiquant l'emplacement de ces sections (partitions) sur le disque.
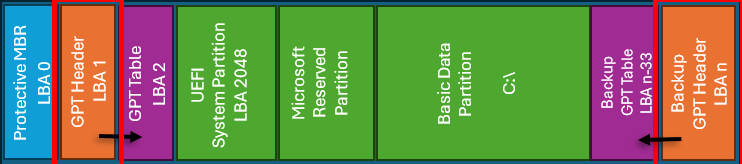
Figure 1 : Schéma d'une installation hypothétique de Windows 10 avec un volume (n = dernier secteur du disque)
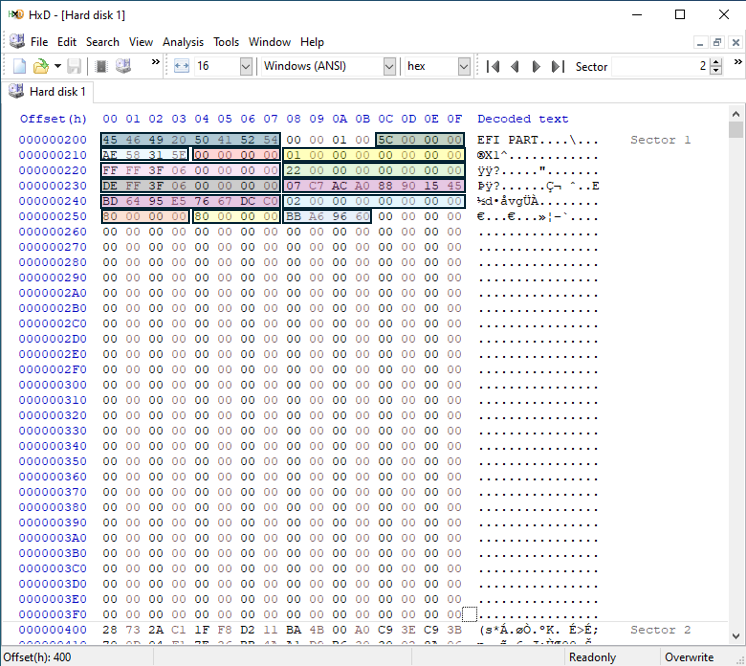
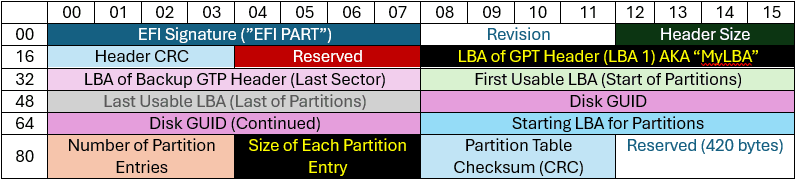
L'en-tête GPT commence par sa signature, EFI PART. Les autres valeurs sont réparties dans le tableau ci-dessous :
L'en-tête GPT commence par sa signature, "EFI PART", et les autres valeurs sont réparties dans le tableau ci-dessous :
Source : https://uefi.org/specs/UEFI/2.10/05_GUID_Partition_Table_Format.html

Jusqu'à présent, les 16 premiers octets de l'en-tête GPT restent constants sur les différents disques GPT.
CRC de l'en-tête GPT

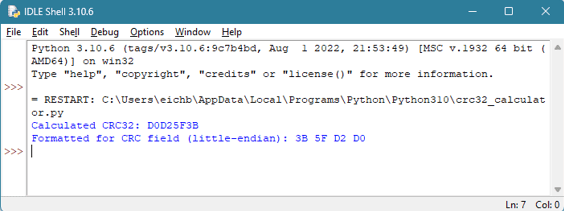
Voici un exemple de calcul du CRC32 pour l'en-tête GPT :
Vous pouvez utiliser un script Python pour calculer le CRC des octets isolés :

Le script Python est disponible à l'adresse suivante https://github.com/eichbaumj/Python

Le script Python prend la valeur CRC32 résultante et la convertit dans le format requis pour l'en-tête GPT. La valeur calculée, dans ce cas, est 0x1B2C37BC. Mais pour la stocker dans le champ de l'en-tête GPT, la valeur est lue en mode "little endian" : 0xBC372C1B.

La capture d'écran ci-dessous montre le GUID mis en évidence dans l'en-tête GPT :

Le GUID est une valeur hexadécimale de 16 octets, mais si vous pensiez pouvoir copier les valeurs, les séparer par des traits d'union et les entourer d'accolades, vous vous tromperiez. Vous obtiendriez une valeur erronée.
Vous pouvez voir que HxD fournit la conversion GUID dans l'inspecteur de données à droite. Mais comment cela se passe-t-il ? Comment cela se passe-t-il ?
55 BA 55 51 2B D8 59 41 BC 1F C4 17 80 0F D7 63
Devenir :
{5155BA55-D82B-4159-BC1F-C417800FD763}
XX XX XX XX | XX XX | XX XX | XX XX XX XX XX XX XX XX XX
55 BA 55 51 | 2B D8 | 59 41 | BC 1F | C4 17 80 0F D7 63
La première série de quatre octets est convertie en hexadécimal petit-endien : 51 55 BA 55
La deuxième série de 2 octets est convertie en hexagone petit-endian : D8 2B
Le troisième ensemble de 2 octets est converti en hexagone petit-endian : 59 41
Les deux autres ensembles de valeurs hexagonales sont laissés tels quels, en mode big-endian : BC 1F | C4 17 80 0F D7 63
Une fois que toutes les conversions sont terminées, nous pouvons les rassembler, en plaçant des traits d'union là où ils doivent l'être et en les entourant d'accolades :
{5155BA55-D82B-4159-BC1F-C417800FD763}
Nous pouvons confirmer qu'il s'agit de l'encodage correct du GUID en lançant diskpart à partir de la ligne de commande et en vérifiant l'identifiant unique du disque :


Nous pouvons utiliser le même script Python mais remplacer les valeurs hexagonales par celles trouvées dans le tableau des entrées de partition.


Nous pouvons voir que la valeur correspond à ce que l'on trouve dans l'en-tête GPT.
Ok, maintenant que nous savons comment l'en-tête GPT est structuré et qu'il y a une sauvegarde située dans le dernier secteur du disque, comment réparer l'en-tête GPT s'il devient corrompu ou effacé ?
Pour réparer l'en-tête GPT, copiez les 512 derniers octets de la fin du disque et collez-les dans le LBA 1 (secteur #2). Notez que quelques modifications sont nécessaires.
Voici un exemple de ce à quoi ressemble l'en-tête GPT de sauvegarde à la fin d'un disque :
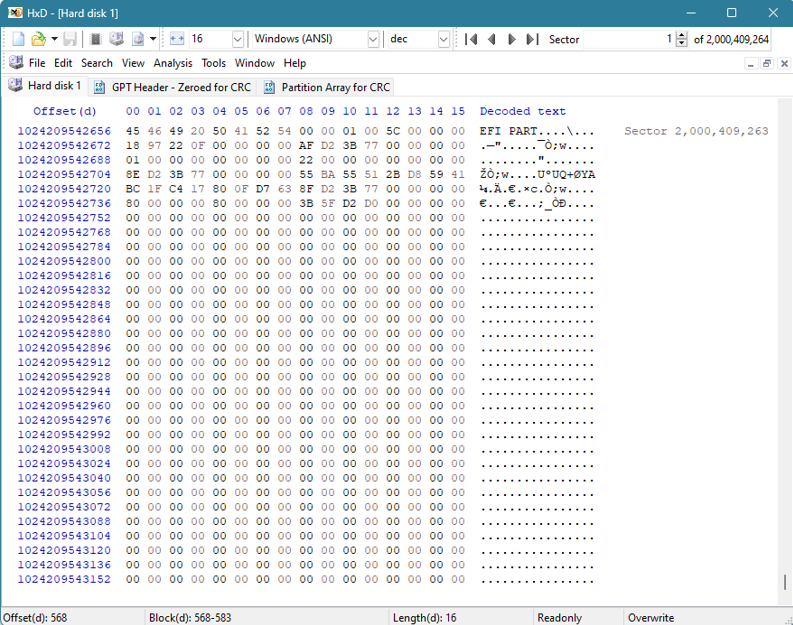
Nous pouvons constater que certaines valeurs restent constantes par rapport à l'en-tête GPT d'origine. Ces constantes sont mises en évidence en rouge ci-dessous :
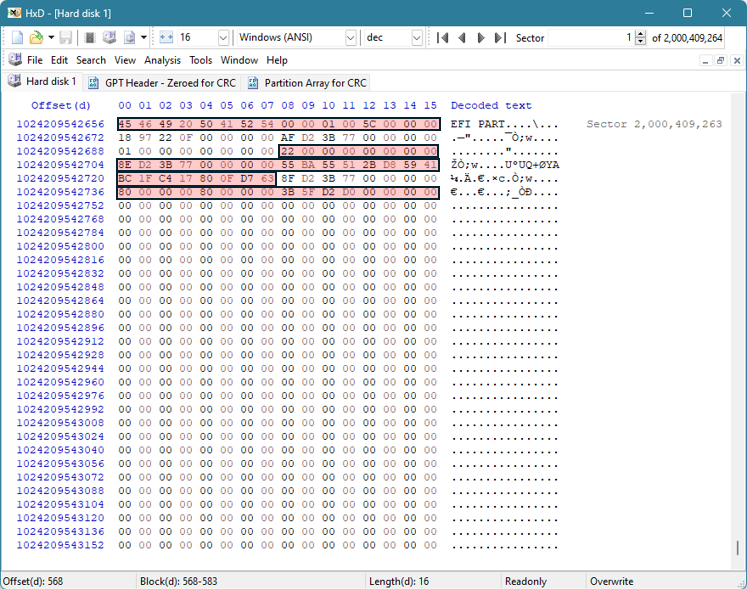
Quatre valeurs doivent être modifiées.
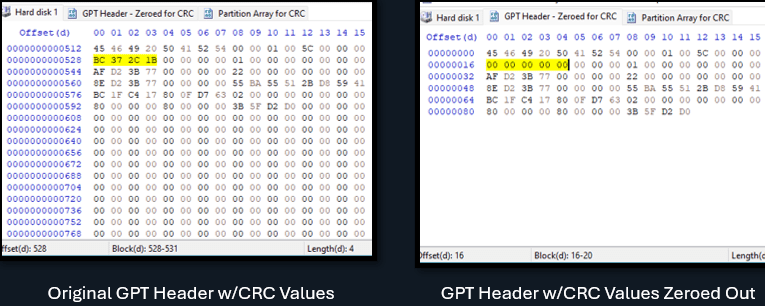
Le premier est le CRC de l'en-tête GPT, sur lequel nous reviendrons. Pour l'instant, ces valeurs peuvent être mises à zéro, car nous devrons utiliser le CRC calculé après avoir modifié les autres valeurs pour obtenir à nouveau le CRC correct.

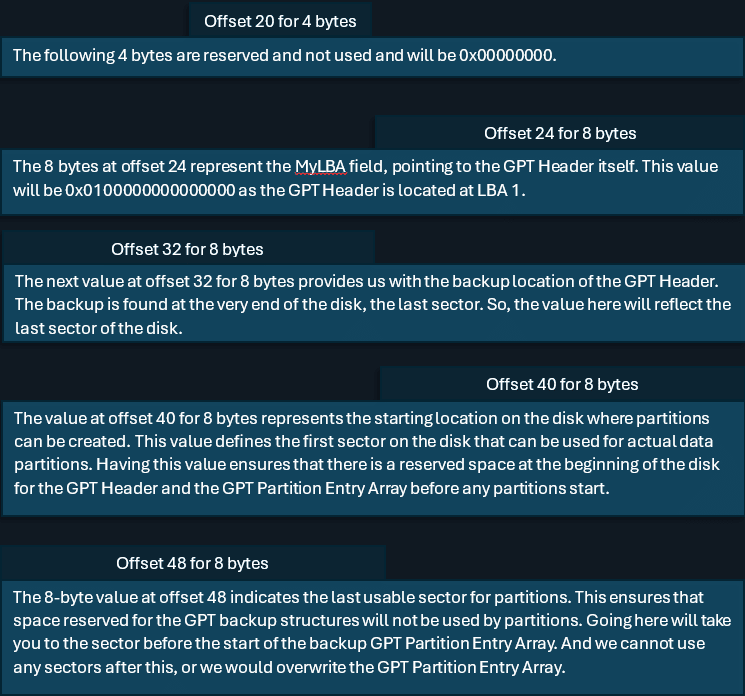
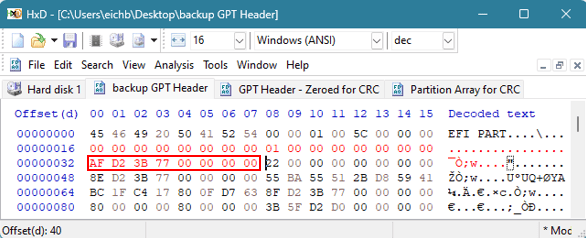
Le suivant est la valeur MyLBA située à l'offset 24 pour 4 octets. Cette valeur indique l'emplacement de l'en-tête GPT (où il se trouve actuellement) et sa position actuelle est LBA 1 ou 0x01000000000000000.

La valeur de 8 octets au décalage 32 est la valeur qui nous indique l'emplacement de l'en-tête GPT de sauvegarde. La sauvegarde pointe actuellement vers l'original, mais nous devons modifier cette valeur pour qu'elle représente le dernier secteur du disque. C'est ce qui s'est passé avec les valeurs hexagonales que nous venons de modifier à l'étape précédente. Dans cet exemple, la valeur doit être modifiée en 0xAFD23B7700000000.
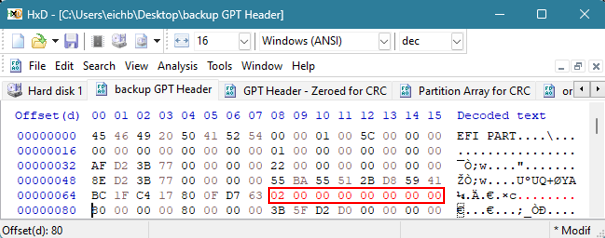
La valeur de 8 octets située au décalage 72 doit refléter l'emplacement et le début de la matrice d'entrée de partition GPT. Actuellement, l'en-tête GPT de sauvegarde pointe vers la sauvegarde de cette matrice. Le tableau de partitions GPT actuel devrait se trouver au LBA 2. Cette valeur doit être remplacée par 0x0200000000000000.
Une fois ces trois valeurs modifiées, il est temps de calculer la valeur CRC32.
La somme de contrôle obtenue est la suivante :

Nous pouvons donc remplacer les valeurs 0x00000000 à l'offset 16 par 0xBC372C1B :
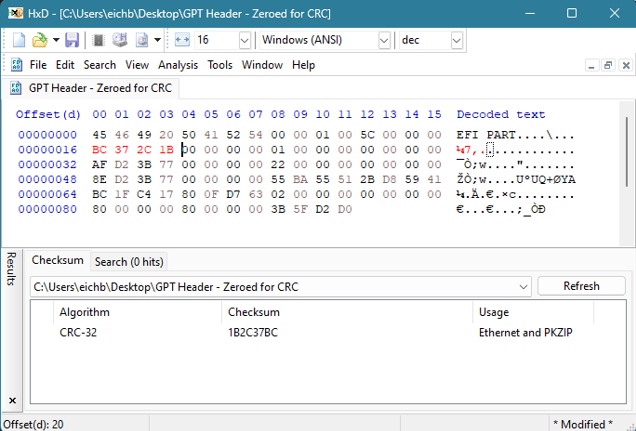
HxD dispose d'un calculateur de somme de contrôle CRC32 intégré sous Analyse -> Sommes de contrôle. La valeur résultante doit simplement être ajoutée en tant que valeur little-endian.
Par curiosité, si nous isolons ces 512 octets pour l'original et la sauvegarde que nous avons restaurée, les valeurs de hachage correspondent effectivement, ce qui indique que nous avons reproduit avec succès l'en-tête GPT d'origine à l'aide de la sauvegarde.

Comprendre les subtilités de l'en-tête GPT est essentiel pour toute personne impliquée dans la criminalistique numérique, la récupération de données ou l'administration de systèmes. L'en-tête GPT définit non seulement la disposition et la structure du disque, mais garantit également l'intégrité des données grâce à des mécanismes tels que les sommes de contrôle CRC32 et les en-têtes de sauvegarde. En maîtrisant les détails de l'en-tête GPT, vous êtes mieux équipé pour dépanner et réparer les problèmes de disque, garantissant ainsi la fiabilité et l'accessibilité des données critiques.
Dans la suite de cette série, nous nous concentrerons sur le tableau d'entrées de la table de partition GPT. Nous explorerons la manière dont les entrées de partition sont structurées et comment elles fonctionnent de concert avec l'en-tête GPT pour maintenir l'organisation et l'intégrité des partitions du disque. Restez à l'écoute pour un guide complet sur l'analyse et la réparation de la matrice d'entrée de la table de partition GPT, qui vous permettra d'acquérir les connaissances nécessaires pour gérer en toute confiance les disques partitionnés en GPT.
Vous avez manqué la première partie ?
Commencer par le commencement : Comprendre le MBR de protection dans les disques partitionnés en GPT (Partie 1) - où nous expliquons comment GPT assure la rétrocompatibilité avec les systèmes existants.
Prêt pour l'étape suivante ?
Poursuivre Partie 3 : Navigation dans le tableau d'entrée des partitions GPT - où nous étudions la façon dont les entrées de partition sont structurées et comment elles complètent l'en-tête GPT.


3 réponses
Superbes pages (celle-ci et la partie 1).
Merci beaucoup !